Sunday, September 29, 2013
Friday, September 13, 2013
Vinyl Cutting Fonts
*borrowed from http://shantasilver.blogspot.com/

Finding well-designed, clean cutting fonts is no easy task. Even when you're paying good money for quality fonts you can run acoss some that the font designer did not take the time to "clean" which means ugly jagged edges for you. Here's Why:
A vinyl cutting machine will only cut vector graphics - even if it accepts JPGS it will convert the image into a vector using it's own auto-trace program embedded in its software. A vector image is made up of points and your machine cuts along those points. Too many points equals jagged edges. The fewer the points, the cleaner the cut is. Usually you can get away with cutting anything small-scale but as soon as you need to cut two or three foot tall graphics, clean graphics become paramount.
The WORST offenders with jagged edges are free fonts and dingbats. I'm sorry to tell you that but that's why they're free. Occasionally you'll find one or two free fonts that are clean but they're few and far between. Fonts that cost less than $10 are usually similar to free fonts in that they're not cleaned up and have too many points. Around the $15-$19 range you begin to find fonts that are crisp, clean and excellent for cutting. So what is a gal with a vinyl cutter supposed to do?
I have compiled a short list of some of my favorite clean cutting fonts with links to MyFonts.com where you can buy them legally. You won't find any free font downloads here (remember those free fonts are choppy) but if you want to download some free SVG files for your Cricut or Silhouette you can click HERE! This is by no means all the fonts that cut well but these are fonts I have personally used or have seen cut cleanly on a vinyl cutting machine.
WARNING: Vinyl cutting machines do NOT accept Open Type fonts. You MUST buy True Type fonts if you wish to cut them on your machine! Click on "Buying Options" at MyFonts.com to select to buy True Type fonts. Some fonts only come as Open Type or will include both True Type & Open Type. Install the True Type only.
Also: Make sure the font you are buying has a commercial license if you are going to sell any vinyl lettering. (And if you have a machine, believe me you will - even if only to friends & family!)
Cute & Crafty Fonts:
Tweedledee: Reliable cutting & weeding, even at TINY sizes
Hayseed: Cute, thick & awesome at all sizes
Sweetheart Script: Adorable scripty font that cuts clean & is great for names & monograms
Just About EVERYTHING from Ronna Penner: She's my go-to font designer for cute, crafty fonts that I know will cut well!
Just About Everything from Filmotype: Another vinyl cutting machine-friendly foundry! (Check for True Type font options first though!)
Scripty & Monogram Fonts: These fonts are all available in True Type
Corinthia: A very popular favorite
Passions Conflict: Bet you've seen it & loved it!
Lovers Quarrel: A sister font to Passions Conflict that's gorgeous, too
Liccorice
Inspiration: Used to exhaustion but it's always a favorite!
The NautiGal
Mea Culpa: Loopy, Extra-Fancy Capitals
Ephesis
Beau Rivage
Just About Everything from TypeSETit: A wonderful foundry that offers stunning, scripty fonts in both Open Type & True Type but you MUST select the correct option under "Buying Choices" when you add the font to your cart!
Click HERE to view my blog post about welding monogram letters to make interlocking, single-piece vinyl monograms that cut as one continuous sticker
But HOW do some people cut Open Type fonts on their Silhouette SD machine?
They use a second software, like photoshop, to type the text onto a blank page and save it in JPG format that their Silhouette Original or Silhouette SD software can import & auto-trace. Voila! Problem solved! (This, however, is why you should water-mark JPG images on your site. You may inadvertantly be supplying your competitors with your entire catalog of graphics!) HINT: Silhouettes cannot import colored JPGs - only black & white ones - so coloring & watermarking your example images solves this problem!
Tay, how do YOU get the same jagged, messy font to cut so clean in the designs you sell online?
The short answer: LOTS of time! Let me explain. Anything in vector format can be edited & cleaned up if you have hours you're willing to spend doing it. Even messy fonts that have a look you like can be cleaned up. Here's a perfect example:

The "m" on the left is typed in the original font. The "m" on the right has been hand-edited by me to remove excess vector points, smooth out curves and make it much more clean cutting without losing the cute feel of the parent font. My edited m can now be cut at huge sizes whereas the flaws of the original letter form would become exaggerated & obvious if cut larger than a few inches tall. It takes 10-20 minutes per letter to correct these types of things (and then a bit longer for me to do my personal 3-step optimizing for superior vinyl cutting before I offer the graphic for sale at PeppermintCreative.com) but to me it's worth the time investment up front to have a design that will cut cleanly for the rest of its life!
Okay Tay, HOW do you clean up dingbat shapes you use?
I don't. Dingbats are infuriating to me so I don't use them. Insead I have a digital drawing tablet and years of practice as a cartoonist & advertising designer so I draw my shapes directly into my computer and then optimize them for vinyl cutting. I know not everyone can do this but that's why I design and give so much stuff away for free!
Click here to download FREE SVG designs, shapes & Graphics for your Cricut with Sure Cuts A Lot (SCAL) vinyl cutting machine!
Click here to download FREE GSD designs, shapes & graphics for your Silhouette SD vinyl cutting machine!
* Freebies are updated every 4 weeks! Check PeppermintCreative.com often & grow your business for FREE!
If you don't see the freebies listed on the front page, click on the "WordArt" heading written in hot pink above and click through the designs until you find the ones marked with "FREE" in hot pink in the price section!
Can I use freebies I download to cut vinyl to sell?
Yes, please do! That's what Commercial Freebies are for! (Freebies under the Digital Die Cutting section are for personal use.) You can cut as much vinyl as you want for as long as you want and make as much money as you want using the freebie design without ever paying a thing! Just please do not sell the digital graphic file itself. :)
I love what I do and I share my talent & gratitude by giving dozens of designs away to hopefully better the vinyl cutting experiences of others! I appreciate the work of font designers and will gladly supply font names & buying links for any of the fonts I use - just e-mail me. A font designer who is paid for their work will make more new fonts for all of us to enjoy!
Vinyl Cutting Fonts: Clean Cut, No Jagged Edges & Easy Weeding for Cricut, Silhouette SD & ALL Vinyl Cutting Machines

Finding well-designed, clean cutting fonts is no easy task. Even when you're paying good money for quality fonts you can run acoss some that the font designer did not take the time to "clean" which means ugly jagged edges for you. Here's Why:
A vinyl cutting machine will only cut vector graphics - even if it accepts JPGS it will convert the image into a vector using it's own auto-trace program embedded in its software. A vector image is made up of points and your machine cuts along those points. Too many points equals jagged edges. The fewer the points, the cleaner the cut is. Usually you can get away with cutting anything small-scale but as soon as you need to cut two or three foot tall graphics, clean graphics become paramount.
The WORST offenders with jagged edges are free fonts and dingbats. I'm sorry to tell you that but that's why they're free. Occasionally you'll find one or two free fonts that are clean but they're few and far between. Fonts that cost less than $10 are usually similar to free fonts in that they're not cleaned up and have too many points. Around the $15-$19 range you begin to find fonts that are crisp, clean and excellent for cutting. So what is a gal with a vinyl cutter supposed to do?
I have compiled a short list of some of my favorite clean cutting fonts with links to MyFonts.com where you can buy them legally. You won't find any free font downloads here (remember those free fonts are choppy) but if you want to download some free SVG files for your Cricut or Silhouette you can click HERE! This is by no means all the fonts that cut well but these are fonts I have personally used or have seen cut cleanly on a vinyl cutting machine.
WARNING: Vinyl cutting machines do NOT accept Open Type fonts. You MUST buy True Type fonts if you wish to cut them on your machine! Click on "Buying Options" at MyFonts.com to select to buy True Type fonts. Some fonts only come as Open Type or will include both True Type & Open Type. Install the True Type only.
Also: Make sure the font you are buying has a commercial license if you are going to sell any vinyl lettering. (And if you have a machine, believe me you will - even if only to friends & family!)
Cute & Crafty Fonts:
Tweedledee: Reliable cutting & weeding, even at TINY sizes
Hayseed: Cute, thick & awesome at all sizes
Sweetheart Script: Adorable scripty font that cuts clean & is great for names & monograms
Just About EVERYTHING from Ronna Penner: She's my go-to font designer for cute, crafty fonts that I know will cut well!
Just About Everything from Filmotype: Another vinyl cutting machine-friendly foundry! (Check for True Type font options first though!)
Scripty & Monogram Fonts: These fonts are all available in True Type
Corinthia: A very popular favorite
Passions Conflict: Bet you've seen it & loved it!
Lovers Quarrel: A sister font to Passions Conflict that's gorgeous, too
Liccorice
Inspiration: Used to exhaustion but it's always a favorite!
The NautiGal
Mea Culpa: Loopy, Extra-Fancy Capitals
Ephesis
Beau Rivage
Just About Everything from TypeSETit: A wonderful foundry that offers stunning, scripty fonts in both Open Type & True Type but you MUST select the correct option under "Buying Choices" when you add the font to your cart!
Click HERE to view my blog post about welding monogram letters to make interlocking, single-piece vinyl monograms that cut as one continuous sticker
But HOW do some people cut Open Type fonts on their Silhouette SD machine?
They use a second software, like photoshop, to type the text onto a blank page and save it in JPG format that their Silhouette Original or Silhouette SD software can import & auto-trace. Voila! Problem solved! (This, however, is why you should water-mark JPG images on your site. You may inadvertantly be supplying your competitors with your entire catalog of graphics!) HINT: Silhouettes cannot import colored JPGs - only black & white ones - so coloring & watermarking your example images solves this problem!
Tay, how do YOU get the same jagged, messy font to cut so clean in the designs you sell online?
The short answer: LOTS of time! Let me explain. Anything in vector format can be edited & cleaned up if you have hours you're willing to spend doing it. Even messy fonts that have a look you like can be cleaned up. Here's a perfect example:

The "m" on the left is typed in the original font. The "m" on the right has been hand-edited by me to remove excess vector points, smooth out curves and make it much more clean cutting without losing the cute feel of the parent font. My edited m can now be cut at huge sizes whereas the flaws of the original letter form would become exaggerated & obvious if cut larger than a few inches tall. It takes 10-20 minutes per letter to correct these types of things (and then a bit longer for me to do my personal 3-step optimizing for superior vinyl cutting before I offer the graphic for sale at PeppermintCreative.com) but to me it's worth the time investment up front to have a design that will cut cleanly for the rest of its life!
Okay Tay, HOW do you clean up dingbat shapes you use?
I don't. Dingbats are infuriating to me so I don't use them. Insead I have a digital drawing tablet and years of practice as a cartoonist & advertising designer so I draw my shapes directly into my computer and then optimize them for vinyl cutting. I know not everyone can do this but that's why I design and give so much stuff away for free!
Click here to download FREE SVG designs, shapes & Graphics for your Cricut with Sure Cuts A Lot (SCAL) vinyl cutting machine!
Click here to download FREE GSD designs, shapes & graphics for your Silhouette SD vinyl cutting machine!
* Freebies are updated every 4 weeks! Check PeppermintCreative.com often & grow your business for FREE!
If you don't see the freebies listed on the front page, click on the "WordArt" heading written in hot pink above and click through the designs until you find the ones marked with "FREE" in hot pink in the price section!
Can I use freebies I download to cut vinyl to sell?
Yes, please do! That's what Commercial Freebies are for! (Freebies under the Digital Die Cutting section are for personal use.) You can cut as much vinyl as you want for as long as you want and make as much money as you want using the freebie design without ever paying a thing! Just please do not sell the digital graphic file itself. :)
I love what I do and I share my talent & gratitude by giving dozens of designs away to hopefully better the vinyl cutting experiences of others! I appreciate the work of font designers and will gladly supply font names & buying links for any of the fonts I use - just e-mail me. A font designer who is paid for their work will make more new fonts for all of us to enjoy!
Mixing Bowl MakeOver
Credit to HowDoesShe.comfor this awesome idea!!
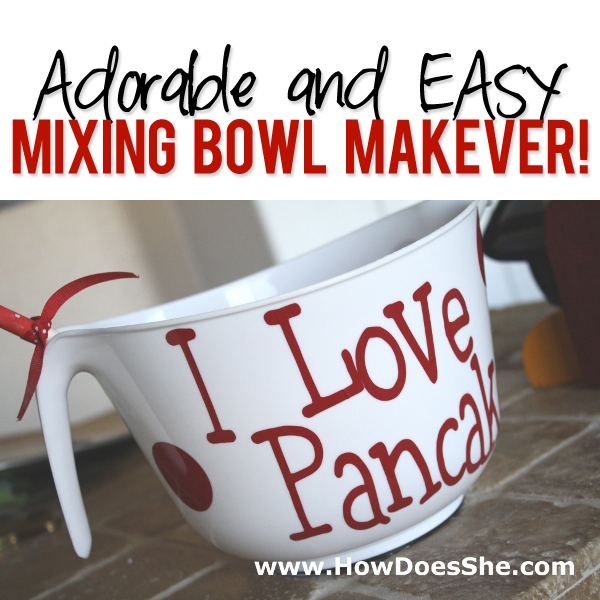
I got this bowl at the dollar store and made it super cute! All it took was a little red permanent vinyl.
Have fun with all your projects…we want to see pics.
Silhouette. Here is a post on why we like the Silhouette craft cutter. We LOVE how you don’t’ have to buy cartridges. We LOVE their customer service. We LOVE how projects turn out using the cutter!
Okay here is the low down on vinyl.
These are the three main types of vinyl I use on my crafting projects:
These are the three main types of vinyl I use on my crafting projects:
1. Oracal 631 Matte
This is what is sold at craft stores for your cricut machine. It is removable and it is a little thicker. It is NOT permanent. Great for general crafting.
This is what is sold at craft stores for your cricut machine. It is removable and it is a little thicker. It is NOT permanent. Great for general crafting.
2. Oracal 651 (available at www.vinylcouture.com)
This is vinyl you’d use out side.
This is vinyl you’d use out side.
3. Oracal 751 or 951
This is the permanent vinyl. I use the 951. It lasts a little longer. This vinyl is thinner! It is harder to cut tiny… tiny things with this vinyl. Just make your font bigger if it’s ‘eating’ your vinyl. I still hand wash my items, but my daughter has put it in the dishwasher and it was fine. I wouldn’t microwave the vinyl. Pour hot water into the mug:)
This is the permanent vinyl. I use the 951. It lasts a little longer. This vinyl is thinner! It is harder to cut tiny… tiny things with this vinyl. Just make your font bigger if it’s ‘eating’ your vinyl. I still hand wash my items, but my daughter has put it in the dishwasher and it was fine. I wouldn’t microwave the vinyl. Pour hot water into the mug:)
Transfer Paper – you really need this to help things stay even so that your crafts look more professional. For small projects you can use painters tape (the blue kind at the hardware store).


57 Comments
Vinyl on Glass
(Borrowed from:
http://www.trulylovelyblog.com/2011/06/my-first-vinyl-on-glass-experience/ )
My First Vinyl on Glass Experience
JUNE 15, 2011


Tuesday, September 10, 2013
How to Use Vinyl


Vinyl is like the thickness and consistency of several layers of paint. It comes in a variety of colors and can be cut into just about any design or wording. The vinyl is similar to the shelf paper that you would put in a cupboard in that it has a sticky back and comes with a backing paper that protects the sticky surface.
It can be used for crafts on wood, tile, glass, plastic, etc
It can also be used for decorating rooms by putting the vinyl directly on the surface of the wall. Popular wall decorations are words and pictures.
1. Clean Surface - First you want to make sure that the surface to which you will be applying the vinyl is clean. The smoother the surface the easier to transfer the vinyl but semi rough still works...like wood, walls, or tile (wash tiles and walls and remove dust from wood - make sure the surface is dry before applying vinyl).
2. Transfer to clear tape - After we cut the design, we put a transfer tape on the surface of the vinyl. You would take something hard and rub the clear top to transfer the vinyl to that clear tape (you can use a credit card, popsicle stick, formica sample from a hardware store, or even your thumbnail). You will then carefully pull off the white backing paper being careful to make sure that the vinyl has transfered to the clear tape.

NOTE: try not to lay the whole vinyl down at once as it may stick to the new surface incorrectly and be very difficult to remove. I usually begin at the bottom and line up that area then slowly adhear the vinyl to the new surface trying to make sure it is even and not bubbling. (It is really not that hard and if you go slow enough and only put small portions down at a time, you can usually pick up and move the image if necessary.)
Note: Vinyl may stretch out of shape if you try to move it around very much. Carefully work with delicate patterns. You can use a flat razor knife to help realign small sections.
4. Remove Clear Tape - Once you have the vinyl on the new surface, rub the clear tape carefully from the center out to remove all bubbles and to adhere the vinyl securly to the new surface. You may have to keep rubbing as you remove the clear tape - start at a corner and go slowly.
4. Remove Clear Tape - Once you have the vinyl on the new surface, rub the clear tape carefully from the center out to remove all bubbles and to adhere the vinyl securly to the new surface. You may have to keep rubbing as you remove the clear tape - start at a corner and go slowly.

When you have the clear tape removed, you may lightly rub with your finger (or back of your nail) to adhear the vinyl smoothly to the new surface. If you feel that it needs a good rubbing, turn the white vinyl paper backing over using the grid side down, place it over the vinyl and use your rubbing stick carefully over the surface.

Bubbles - If you find bubbles in the vinyl, take a pin and prick the bubble then use your thumbnail and press the bubble down until it no longer shows.
Protective Finish - If you have put your vinyl on wood, you may want to spray a sealing spray over the surface of the board and vinyl...that is okay. It is not necessary to put anything on the vinyl unless desired.
Protective Finish - If you have put your vinyl on wood, you may want to spray a sealing spray over the surface of the board and vinyl...that is okay. It is not necessary to put anything on the vinyl unless desired.

You can also overlay the vinyl for some special looks.

If you are making magnets, you may even want to modpodge over the entire vinyl surface. We have done that and it looks nice and makes it so the surface can be washed.

If you are putting the vinyl on a dish, you may want to put it on the under side or get a sealing substance to cover it so the dish can be cleaned. Vinyl should not be put into anything that is damp or causes heat (like steam filled area or a dishwasher) as it will soften and distort (but it can be used in a well ventalated bathroom or kitchen).

Cleaning - Do not wash the vinyl. Take a light cloth and dust carefully.
Stencil - If you are using the vinyl as a stencil, make sure that you have a clean surface. Be sure to securly adhere the vinyl around the image that you will be using as the stencil so the stenciling material such as paint or etching paste will not seep under the vinyl. You will only be able to use the stencil one time as it will distort and rip when removing it from the surface. Be sure to order a reverse image if you are putting it on a surface such as the under side of a dish.

Car Vinyl - This vinyl may be used on cars and has a normal exposure life expentancy of 2-3 years. Actual car vinyl is a little thicker and the expentancy is 2-5 years (under normal exposure)
Removing Vinyl - Vinyl can be easily removed off of glass or wood if heated slightly. Use a hair dryer to soften the seal and lightly scrape. For removing from walls, be careful to not scrape too hard so as not to ruin the finish. If vinyl has been left on a wall for a time, you may need to repaint as paint colors do change over time and the paint that is covered with vinyl will remain the same. This will cause shadowing on your wall when the vinyl is removed. (This is the same effect that hanging a picture on your wall may present.)
Note: Very seldom can vinyl be removed in one piece to be used again.
Credit for this goes to:
http://vinylgiftsandmore.com
Subscribe to:
Posts (Atom)